Shaker style cabinets are known for their timeless appeal, clean lines, and versatility. Whether you’re looking to refresh your kitchen on a budget or simply want to update the look of your existing shaker cabinets, there are plenty of easy DIY ideas to consider. In this article, we’ll explore creative and affordable ways to update your shaker style cabinets without the need for a full remodel. Plus, we’ll highlight some tips on where to find quality cabinetry at a great price from a Kitchen Cabinet Shop.
Why Choose Shaker Cabinets for DIY Updates?
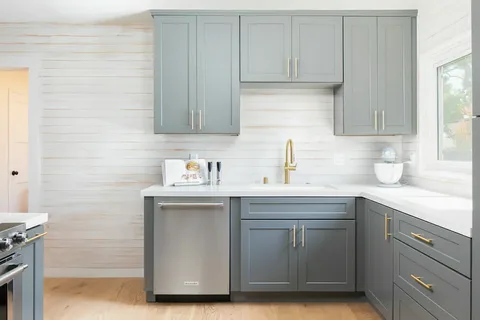
Shaker cabinets are ideal for DIY projects because of their simple, clean design. The minimalist aesthetic of shaker cabinets makes them easy to update with a variety of materials and finishes. Whether you’re looking to add a fresh coat of paint, swap out the hardware, or introduce a new design element, shaker cabinets provide the perfect canvas for creativity. Here are some of the reasons why shaker cabinets are great for DIY updates:
1. Simple Design for Easy Customization
The straightforward design of shaker style cabinets makes them easy to work with. Unlike more intricate cabinet styles, shaker cabinets feature flat panels and minimal detailing, which makes them highly adaptable to various updates. This makes shaker cabinets a perfect choice for DIY projects, as they can be easily modified without compromising their core design.
2. Timeless Appeal
Shaker cabinets’ classic design ensures that any updates you make will be versatile and timeless. Whether you choose to update your shaker cabinets with a bold new color or add modern hardware, the changes you make will still complement the overall style of your home, ensuring that your kitchen remains stylish for years to come.
3. Cost-Effective Updates
Updating shaker cabinets is often more cost-effective than completely replacing them. Small, strategic updates can completely transform the look of your kitchen without the high costs associated with a full remodel. This makes shaker cabinets an excellent choice for homeowners on a budget.
Easy DIY Updates for Shaker Style Cabinets
Here are some simple, budget-friendly DIY ideas for updating your shaker style kitchen cabinets. Whether you want a subtle refresh or a bold change, these tips can help you make your cabinets look brand new.
1. Repainting or Refinishing Your Cabinets
One of the easiest and most effective ways to update your shaker style cabinets is by giving them a fresh coat of paint or refinishing the wood. Here’s how to do it:
- Step 1: Remove the cabinet doors, drawers, and hardware. Clean all surfaces thoroughly to remove grease and dust.
- Step 2: Sand the surfaces lightly to create a smooth base for the paint or finish. For wood cabinets, you may want to strip the old finish before sanding.
- Step 3: Apply a primer to ensure the paint or stain adheres properly to the surface. Let the primer dry completely.
- Step 4: Apply your choice of paint or stain. Choose a modern, bold color like navy, emerald green, or charcoal for a dramatic look, or stick with classic whites or neutrals for a more traditional feel.
- Step 5: After the paint has dried, apply a clear topcoat for added durability.
Repainting or refinishing your cabinets allows you to change their look entirely and gives your kitchen a refreshed, updated feel without the need for new cabinetry.
2. Updating Cabinet Hardware
Sometimes, the simplest updates can make the biggest difference. Swapping out the hardware on your shaker style cabinets is an easy and affordable way to give them a more modern or personalized look. Here’s how to do it:
- Step 1: Remove the old knobs or handles from your cabinets. If there are any holes left behind, you can fill them with wood filler and sand them down.
- Step 2: Choose new hardware that complements the look you want to achieve. For a sleek, contemporary look, consider matte black or brushed gold handles. For a more traditional look, opt for classic brass or bronze knobs.
- Step 3: Install the new hardware in the same positions as the old ones, ensuring that the holes align correctly. If you’re changing the size of the hardware, you may need to drill new holes.
Updating the hardware can completely change the look of your shaker cabinets, making them feel more fresh and on-trend.
3. Add Glass Inserts to the Doors
For a more elegant and sophisticated look, consider adding glass inserts to the doors of your shaker cabinets. Glass panels allow you to display your dishes, glassware, or decorative items, while still maintaining the simple, elegant design of the shaker style.
- Step 1: Measure the dimensions of your cabinet doors and purchase glass panels that fit.
- Step 2: Carefully remove the center panel of each door using a utility knife or saw.
- Step 3: Install the glass into the frame of the door using adhesive or glazing points. Be sure to secure the glass properly so it won’t move or rattle.
- Step 4: Reinstall the doors and admire your updated shaker cabinets.
Glass inserts are a beautiful way to add visual interest and create a more custom look for your kitchen.
4. Add Decorative Molding or Trim
If you want to make your shaker cabinets look even more elegant, consider adding decorative molding or trim. Adding crown molding at the top of your cabinets, or base molding along the bottom, can give them a more refined, custom look.
- Step 1: Measure the areas where you want to add molding or trim.
- Step 2: Choose a style of molding that complements your shaker cabinets, whether it’s traditional crown molding or a more modern, sleek trim.
- Step 3: Cut the molding to the appropriate lengths and attach it using wood glue or nails. Be sure to check for level alignment.
- Step 4: Paint or stain the molding to match the finish of your cabinets.
Molding and trim can add a touch of luxury to your shaker cabinets, giving them a more high-end feel.
Where to Find Shaker Cabinets and Supplies
When updating your shaker style cabinets, it’s important to source your materials from a reliable Kitchen Cabinet Shop. Here are some tips for finding quality cabinets and supplies for your DIY projects:
1. Choose a Supplier with a Wide Selection
Look for a Kitchen Cabinet Shop that offers a wide variety of shaker style cabinets, finishes, and hardware options. This will give you more flexibility when choosing materials for your DIY updates. Whether you need paint, stain, hardware, or glass inserts, a supplier with a large selection will have everything you need.
2. Work with a Reputable Supplier
Choose a supplier with a good reputation for providing high-quality products and excellent customer service. Be sure to read reviews and ask for recommendations from friends or family. A trusted supplier will offer expert advice and guidance to help you achieve the look you want.
3. Consider Online Options
In addition to local suppliers, there are many online retailers that offer shaker style cabinets and DIY supplies. Shopping online allows you to compare prices and find the best deals. Just be sure to check return policies and reviews before making a purchase.
Final Thoughts on DIY Updates for Shaker Cabinets
Updating your shaker style cabinets is a great way to refresh your kitchen and make it feel like new without the expense of a full remodel. Whether you choose to repaint, update the hardware, add glass inserts, or install molding, these simple DIY projects can help you achieve a stylish, custom look. By working with a trusted Kitchen Cabinet Shop, you can find everything you need to complete your updates and enjoy your newly refreshed space.

