If you’ve dealt with hoses, pipes, or fluid transfer equipment, you’ve likely worked with cam and groove fittings (also referred to as cam and groove couplings or cam and groove hose fittings). These convenient quick-connect fittings allow you to easily couple and uncouple hoses with absolutely no tools required. Pro Flow Dynamics is the expert supplier of high quality cam and groove couplers, cam and groove hose fittings, and complete cam and groove coupling systems.
What is a Cam and Groove Fitting? (Quick Primer)
Before diving into installation, it helps to understand what you’re handling:
- A cam and groove coupling (often shortened to camlock) is a two-piece quick-connect system: a male adapter (plug) and a female coupler (socket) that lock together by cam arms engaging a groove.
- When the cam arms are closed, the adapter is drawn into the coupler, compressing an O-ring or a gasket and sealing.
- There are various types (Type A, B, C, D, E, F, etc.) based on whether the ends are threaded, hose barb/shank, etc.
- The major benefits: fast to connect/disconnect, no chance of cross-threading, consistent pressure on the seal, and perfectly suited to fluid (liquid or powder) transfer.
Tools & Materials You’ll Need
As you begin, collect:
- The cam and groove adapter and coupler (or cam and groove hose fitting set) of the same size and type
- Hose or piping to mate with your fitting
- Hose clamps or crimps (if using a hose shank / barb style)
- Wrenches suitable to your fitting end (if your fitting end is threaded)
- Lubricant compatible with the fluid (optional, for gasket)
- Clean cloth / rag
- Safety gloves, eye protection
Step-by-Step Installation of Cam and Groove Hose Fittings
Here’s how you do it in a clear, sequential manner:
1. Select the Correct Size & Type
- Measure the inner diameter of the hose or pipe (if it’s a hose) or thread size (if threaded).
- Select a cam and groove fittings (coupler + adapter) that is comparable. For instance, a 2-inch hose requires a 2-inch cam and groove coupling.
- Ensure both the coupler and adapter are the same types (e.g. if the coupler is Type C — female hose barb, your adapter needs to be the same).
- Verify material compatibility (brass, stainless steel, aluminum, etc.) with your fluid.
2. Prepare the Hose / Pipe Ends
- Cut hose end square and take off any burrs, dirt, or contaminants.
- Wipe the inside and outside of hose / pipe ends clean with a clean rag.
- For hose barb (shank) type: slide a hose clamp or crimp ring onto the hose prior to fitting installation.
- Optional: Slightly lubricate the gasket / O-ring on cam and groove pieces (with a lubricant appropriate for your fluid) to assist in beginning the seal.
3. Attach Cam and Groove to Hose / Pipe
Depending on your preference:
A. Hose Barb / Shank (for cam and groove hose fitting style):
- Put the male adapter or female coupler (the one with the barb) far enough into the hose that it seats securely.
- Slide the hose clamp over the barb region, locate it close to the base (but not obstructing the cam arms’ operation) and tighten or crimp tightly.
- Make sure there is no gap and that the connection is tight.
B. Threaded Connection:
- If both ends are threaded (NPT, BSP, etc.), thread on the mating pipe or fitting.
- Apply thread sealant or PTFE tape if necessary (based on fluid and application).
- Tighten with a wrench until it is snug — do not overtighten, as cam and groove couplings are sealed by cam pressure, not torque.
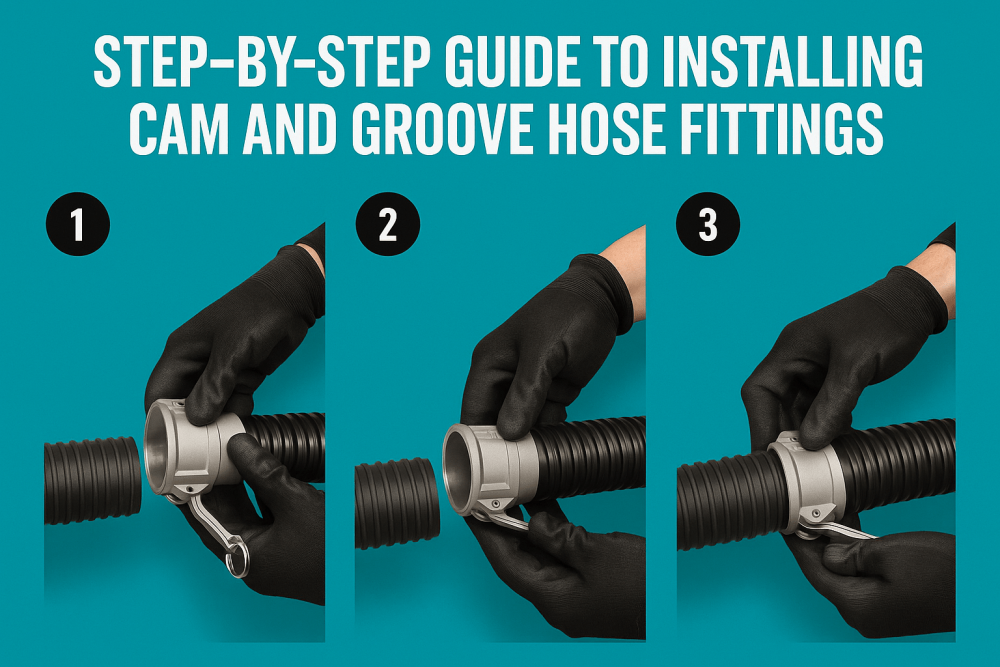
4. Insert the Adapter into the Coupler
- Spread the cam arms on the female coupler wide open (lift them up).
- Insert the male adapter into the coupler in a manner that the groove of the adapter is aligned inside the coupler. The gasket or O-ring should be in good contact with the inner side.
- Ensure that the adapter is fully seated, flush and centered in the coupler.
5. Lock the Cam Arms
- Once the adapter is seated, start closing the cam arms (lever handles) on the coupler.
- Push down both handles at the same time, letting the cams engage and draw the adapter in tightly.
- The arms will lock to an over-center position, keeping the coupling secure.
- If the arms have locking pins or safety cotter rings, insert them to prevent accidental opening.
6. Inspect / Test the Connection
- Visually inspect that the cam arms are closed and seated properly.
- Wiggle ever so slightly to test for slippage.
- Add pressure or fluid flow and inspect carefully for leaks at the joint, hose clamps, threads, or gasket location.
- If there is leakage, depressurize the system, re-open the arms, re-seat the adapter, re-close, and retest.
7. Disconnection (When Needed)
- Depressurize or shut off flow prior to decoupling.
- Take out safety pins (if present).
- Raise the cam arms up to break the grip.
- Pull the adapter and coupler apart.
- Wipe off any residue, check O-ring integrity, and reassemble when necessary.
Tips, Best Practices & Troubleshooting
Following are additional tips to assist with your installations:
- Always equal sizes precisely. Inconsistent coupler vs adapter results in leaks.
- Prevent over-tightening threaded components — sealing must be achieved through cam arms, not over-torque.
- Locking pins or safety clips should be used particularly in vibration or dynamic applications.
- Periodically check the O-ring or gasket; replace if cracked, worn, or damaged.
- Coupling surfaces should be kept clean — dirt, grit or debris can harm the seal.
- Lubrication (if permitted) can minimize friction and wear from repeated coupling.
- For critical or high-pressure applications, utilize cam locks designed for your operating temperature and pressure.
- Train personnel in safe coupling/decoupling — abrupt release under pressure is unsafe.
Summary & Closing
Installing cam and groove fittings (or cam and groove couplers / couplings / hose fittings) is easy if you take the proper steps: proper size and type selection, hose or pipe end preparation, clamping or threading in place, adapter insertion, cam arms locking, and quality checks. All this makes for a quality installation that works well and does not leak much.
At Pro Flow Dynamics, we take pride in providing high-quality cam and groove products for all applications. If you are interested in browsing our complete inventory of cam and groove couplings and cam and groove hose fitting.