When you think of upgrading your clothing, sew-on patches instantly come to mind. Those chic and sleek pieces may look simple, but creating them into a smartly designed emblem is surely a big challenge. Plenty of steps are involved behind the scenes to let those crests come into being. This blog uncovers all of that and much more, so you can get yours professionally.
Since it’s challenging, a professional patch maker gets into the nitty-gritty of the process. Every detail is considered important, from durability to designing. So, by the end of this blog, you’ll surely master a few aspects:
- Choosing the best options for your crests.
- DIY your own elegant patches.
Sew-On Patches Are No Longer a Piece of Cake!
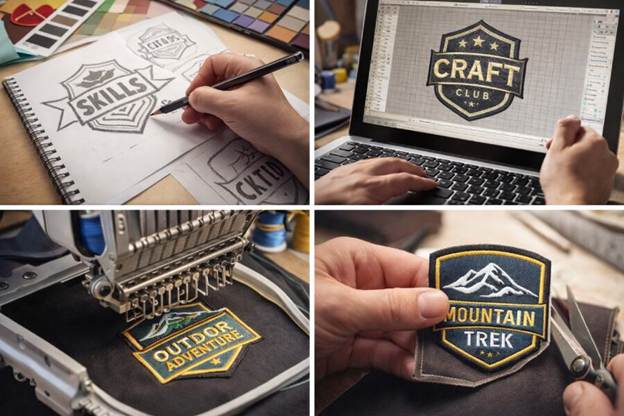
As easy as it is to put them on any of your garments, it has become quite difficult to pull them off. People want their sew on patches to look perfect, and that demands a lot of effort. Before you finally enjoy the joy of its application on your favorite outfits and accessories, there’s a long journey.
There are many decisions you must make during that journey. Each of those will decide how professional your patches come out. The best part? This blog has broken it down into several steps so you understand them better.
The results? Emblems that feel like they came straight from your imagination.
What Goes Into Designing a Professional Sew-On Patch?
1. Why Is It Important to Define the Purpose of a Sew-On Patch First?
The first step is the most crucial. You must be clear about the biggest ‘why’ of this journey. Ask yourself why you need the patches in the first place. Some patches are made for branding purposes, while others represent teams.
When you decide why you want the patch, you will make the rest of the journey easy. The decision you have to make regarding style, colors, and detailing will become a breeze.
Simply put, when your vision for the emblem is sorted, it will be much easier to achieve the desired look.
2. Where Do Patch Design Ideas Usually Start?
The second step is to be clear about the design idea. You must do your research related to the brand, theme, or even message that you want to deliver.
The research doesn’t end with preparing a picture of your patch in mind. But you can also bring your imagination out on your paper. You can always start slow with a rough sketch. Later, you can add symbols, icons, text, and other elements.
Even after the creation of this early concept, the work isn’t over. Rearranging the design elements is always on the table until it moves from the pipeline to the designer.
3. Which Shape and Size Work Best for a Sew-On Patch?
Be clear about what sort of shapes you want. Common shapes like circles, rectangles, and shields are surely the best and safest options. But if you want something amazing, you have to take a little risk, a calculated one!
Don’t hesitate to try out different shapes that make it look different, but in a good way.
While new shapes are great for a modern outlook, sticking to the generic ones will be more practical.
Doing this, you can’t overlook dimensions since they can make or break your crest. Imagine having a great basic uniform whose patch covers half of your garment.
The solution? Adjust the size according to the garment or accessory.
Common Patch Shapes and Their Uses
| Patch Shape | Common Uses |
| Circle | Club logos & Badges |
| Rectangle | Name tags & Uniform patches |
| Shield | Military or Security patches |
| Custom Shape | Brand logos & fashion patches |
4. What Colors and Fonts Make a Patch Stand Out?
Consider this an extension to choosing shape and size. While you do that, decide on the color palette. Designers will give you some options, but you make the final call. So, do enough research on what colors go best together.
High-contrast colors are always preferable because they are quite visible once embroidered. Don’t forget to take your brand into the decision journey.
When it comes to fonts, the simpler the merrier! “Stick to basics” is the usual advice. But you can go a little out of the box depending on your needs. Just make sure it is readable and understandable within a few seconds of a glance.
5. How Is a Patch Design Prepared for Embroidery?
Once the design is finalized, it’s time to digitize. To get elegant embroidered patches NZ, solid machines are required. When you hire a reputable patch maker, this thing is sorted.
They will digitize your concept and turn it into a special file. That file basically guides how to stitch the design.
Even at this stage, you’ve got to make some decisions. Choose the type of stitching and densities. Your patch maker will guide you about it in detail.
6. Do Professional Patches Always Require a Sample First?
Yes, they do! Before you begin the full-fledged production and invest all your money, take a break and create a sample. This will ensure you’re putting your money on the right design that is free from any errors.
This last step is great to adjust the design again according to your purpose. If it looks different than the original design, you can always go back to your drawing board and adjust accordingly.
Creating a sample first ensures your final batch meets your expectations.
7. What Ensures Quality During Patch Production?
Maintaining the quality of your patches is the key to a great final product. This last stage is all about monitoring whether the crests are made according to your choices.
During manufacturing, each crest is inspected so you get a clean, nice stitch. The patch maker will check if the edges are properly finished.
Once the quality control team gives a green flag, you know that your crest is ready for the application.
Common Mistakes to Avoid When Designing Sew-On Patches
Even with a well-defined process, you can make mistakes. Here are some mistakes people make that you should avoid at all costs:
- Color with low contrast or too many colors. Balance is the key here!
- Too small or too big patches can destroy the vibe. So, keep the size in check.
- Never skip the sampling stage so the issues can be identified beforehand.
- Overcomplicating the design is a big no. Simplicity results in better appearance.
Quick FAQs
1. What fabric is best for sew-on patches?
Twill, felt, and cotton are the most commonly used fabrics. That’s because the embroidery sits well on those fabrics. Choosing the right one lets your patch stay brand new for a long time.
2. What is the ideal size for a sew-on patch?
When deciding the size, think of where you want to place it first. Mostly, sew-on patches are 2 to 4 inches, depending on the placement. This size is generally suitable for jackets, bags, and uniforms.
3. Why is digitizing important for embroidered patches?
Digitizing turns a patch into a machine-readable format. The stitch density and direction are determined by the machine using that file. If you want your details to go perfectly, proper digitizing is a must.
Great Patches Require a Great Process!
When you get into the journey, you may find it difficult. But only if you have this roadmap and a bunch of advice can you cross this journey easily.
From getting the concept ready to the final quality check, each and every step is important. When you get your samples ready and choose the right font, size, and design element, you increase the likelihood of incredible patches. No more blunders. Once you follow these steps, your destiny and garments will only have professionally looking sew-on patches.