Heat move vinyl, otherwise called T-shirt vinyl, or iron-on vinyl, are simple and fun ways of putting a customized plan on textures. You can make amazing things like T-shirts, caps, packs, pads, and towels for sports groups, fun occasions, or satisfy a creating interest.
Looking for the best heat transfer vinyl, you are in the right place. Atlanta Vinyl is the online store that offers the best quality sister heat transfer vinyl, oracle permanent adhesive vinyl, transfer tape, and more crafting supplies at a reasonable cost. Buy now and get a 30% discount on the Atlanta vinyl coupon code while shopping.
Part1
Making Your Design
1. Pick and buy vinyl.
There are many tones and examples to browse. Look online for vinyl, or visit your nearby specialty store to find out about what the vinyl will resemble. Consider carrying texture tests with you to ensure your vinyl variety will be noticeable.
Ensure you buy a vinyl viable with the texture you need to utilize. A few types of vinyl are just for cotton; others work best on spandex.
2. Plan your picture utilizing the program.
You can utilize a program like Photoshop or free options like Gimp, Seashore, and Pixlr.
Pick intense, simple, peruse text styles while adding letters to your plan.
Evaluate how much room you will have on the new material before making the transfer. For instance, if your design is for a baseball cap, keep it simple and avoid including too much information.
3. Pick pre-printed vinyl plans
The off chance that you don’t have plan programming. You can buy vinyl plans on the web and in stores.
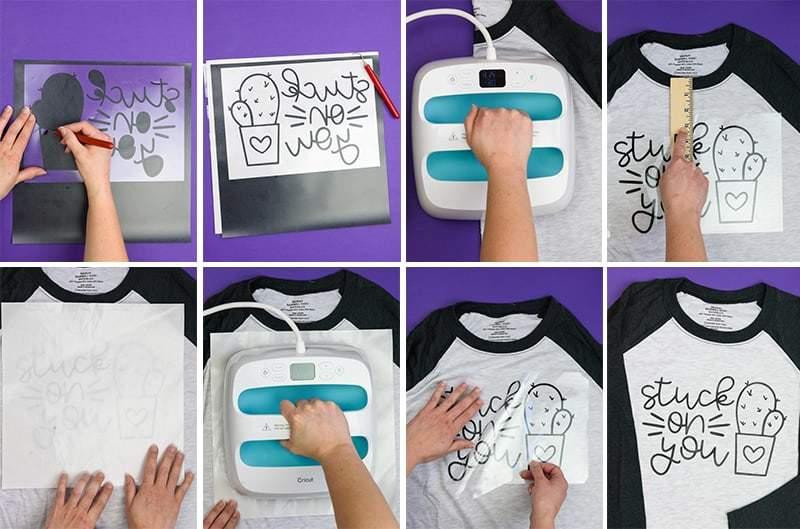
4. Switch your plan.
It is vital to recollect to switch the picture, with the goal that it doesn’t come out in reverse on your result. Most programming will have a choice to “reflect” the image; if not, use alter devices like “flip flat” or “flip vertical” to ensure you print your plan as an exact representation of what you need.
If you’re utilizing words, ensure the letters are in reverse; for instance, “love” ought to peruse as “evil” in your plan.
5. Run your configuration as per the guidelines of your shaper.
Remember that most machines need you to handle the vinyl with the dull side up if you use a specialist shaper.
6. Print your picture straightforwardly on the vinyl on the off chance that you don’t have a shaper.
Ensure your vinyl’s picture prints on the back, the dull side. You might have to chop the vinyl sheet to the printer paper size. On the other hand, print your picture on paper, and afterward, use artisans’ tape to tape down the form to the vinyl and your work surface.
7. Remove your plan the hard way if you are not utilizing a shaper.
Put your vinyl on a work area sparkling side down. Utilizing an Exacto blade or accuracy scissors, cautiously follow the stencil you have printed out.
Enjoy reprieves to ensure you are carving through the central layer but not slicing through the whole vinyl.
You can utilize a paper puncher or a bite-the-dust slice machine to make quick shapes.
8. Strip your vinyl.
Cautiously strip away the transparent layer of the vinyl, trying not to tear any piece of your picture. Strip away all that isn’t important for your final plan.
9. “Weed” your plan with sharp instruments like a sharp needle and Exacto blade.
Weeding is where you eliminate little pieces of your picture’s negative space. Utilize the sharp places of your apparatuses to get little regions and strip them off more effectively.
Part2
Applying Your Design
1. Heat a garment’s iron to the temperature of your vinyl’s bundling.
Setting up your texture by running your iron over it to get out all kinks and moisture is likewise significant.
2. Lay your plan onto the texture, this time gleaming side up.
It ought to be situated as you maintain that it should search in your result.
3. Compress your iron onto your plan for around 10 seconds.
Move along to the following segment of your plan, and press for an additional 10 seconds, ensuring each piece of the vinyl gets pressed on! Try not to rub the iron over the vinyl as though you were pressing a thing of dress rapidly; you would relatively not inadvertently wrinkle the vinyl.
4. Strip off the transporter sheet.
Peruse the directions accompanying your vinyl; some expect you to strip off the transporter sheet once your venture has cooled, while others should be stripped off immediately.
Part3
1. Wash your new thing back to front utilizing cold water.
Try not to wash your thing for 24 hours after applying the intensity move vinyl. Follow the consideration mark of the item, yet don’t carry it to the laundry; the synthetics utilized are excessively brutal.
2. Dry your thing with low or no intensity, and iron your vinyl thing cautiously.
Once more, turn the texture back to the front, and tumble dry on low intensity. On the other hand, you can lay your thing level to dry or line dry it. Use Teflon sheet paper over the vinyl while pressing, turn the thing back to front, and utilize low intensity on the iron.
3. Fix regions by stripping off with an iron and Teflon paper.
Assuming your vinyl is stripping off, iron the stripping parts back on with a similar intensity setting you utilized for that vinyl previously, putting Teflon paper over the vinyl ahead of time. Press for 15-20 seconds.