Using the Wavlink AC1200 WiFi extender setup. is an easy process. Firstly, ensure that the extender is plugged into a power source that is connected to the current WiFi network. Keep off till the indicator lights level off. Find the “Wavlink” default WiFi network by using your laptop or mobile device to look through your accessible networks. To view the setup page, which usually exists at http://ap.setup or http://192.168.10.1, connect to it and open a web browser. To pick and enter a password for the present WiFi network, follow the on-screen prompts. Set the preferences of the extender, like the network name and password, to finish the set up. Join your devices to the new network once they have been saved for improved WiFi service.
Requirement for wavlink ac1200 wifi setup
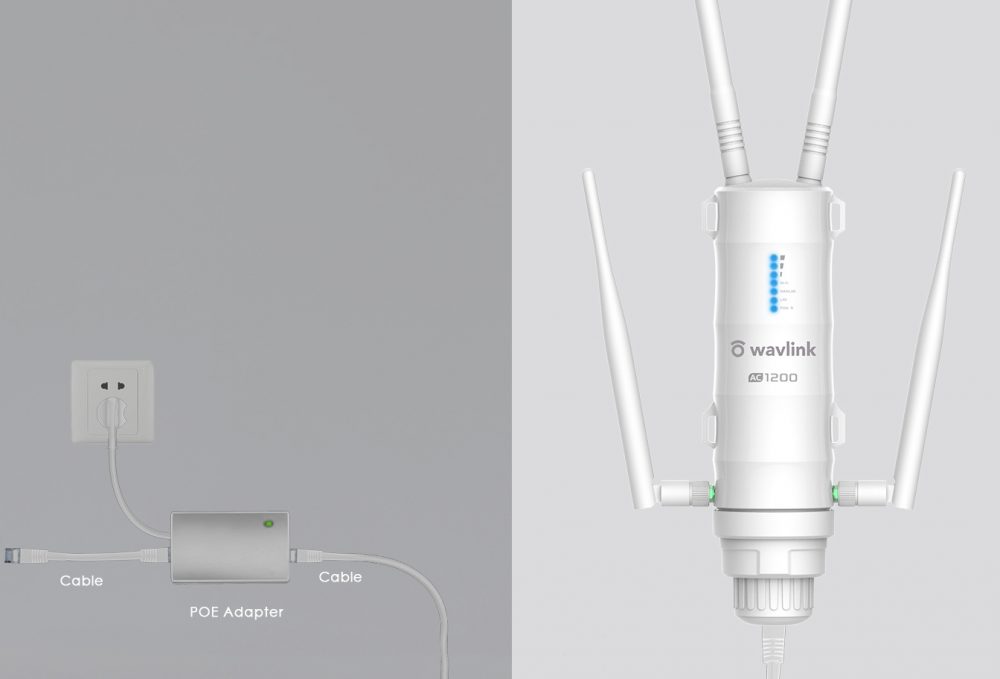
- put the Wavlink AC1200 into a wall socket.
- For better signal strength ensure the extender fits within the current WiFi router’s effective range.
- Join the default WiFi network that the extender emits using a PC, tablet, or smartphone (usually named “Wavlink”).
- With the IP address of your choice (e.g., http://ap.setup or http://192.168.10.1), open a web browser and go to the setup page.
- To select to set up a link to the current WiFi network, refer to the on-screen steps. After making corrections to the network name and a password, save the settings.
Manual method of wavlink ac1200 setup
- Connect the AC1200 to a power outlet and wait for the device to power up. Ensure it’s within range of your existing WiFi network.
- Use a computer or mobile device to connect to the default WiFi network broadcasted by the extender (usually named “Wavlink”).
- Launch a web browser and enter the default IP address (e.g., http://ap.setup or http://192.168.10.1) in the address bar.
- Enter the default login credentials (usually “admin” for both username and password) to access the extender’s setup page.
- Select your existing WiFi network from the list and enter the password. Start the setup via the steps given on the screen.
- After configuring preferences such as a new network name and password, save the settings. Reconnect your devices to the extended network for enhanced WiFi coverage.
NOTE : If you need any help regarding your wavelink wifi range extender so get in touch with the technician or visit the official web site that is ap setup.
Wavlink ac1200 setup via wps button
- Plug in the AC1200 and turn it on by connecting it to a power source.
- Locate the WPS button on the extender and press it. The extender’s WPS LED should start to blink.
- Within 2 minutes, press the WPS button on your existing WiFi router.
- Allow the extender and router to establish a connection. The WPS LED on both devices should become solid, indicating a successful connection.
- Once connected, the extender is ready to use. Place it within the desired range to enjoy extended WiFi coverage. No further configuration is needed.
Login method for wavlink ac1200 setup
- Plug in the AC1200 and turn it on by connecting it to a power source.
- Use a computer or mobile device to connect to the default WiFi network emitted by the extender (usually named “Wavlink”).
- Launch a web browser and type the default IP address (e.g., http://ap.setup or http://192.168.10.1) into the address bar.
- You’ll be prompted to enter login credentials.Take use of the usual login information, that’s often “admin” for both.
- After successful login, you’ll gain access to the extender’s setup page.
- Follow on-screen instructions to configure settings such as network preferences. Save changes, and your Wavlink AC1200 extender is ready for use.
Firmware update on wavlink ac1200 setup
- Ensure your computer or device is connected to the Wavlink AC1200 network.
- Open a web browser and type the extender’s IP address (e.g., http://ap.setup or http://192.168.10.1) in the address bar.
- Enter your login credentials (default is often “admin” for both username and password) to access the extender’s setup page.
- Look for the “Firmware Update” or similar section in the menu.
- If a new firmware version is available, there should be an option to update. To start the update method, listen to the on-screen advice.
- the extender will likely reboot. Your Wavlink AC1200 is now running the latest
How do I reset my wavlink ac1200 wifi setup?
- Check for the Wavlink AC1200 extender’s reset button. typically, it’s a small insert button.
- Press and hold the reset button for about a minute using a paperclip or other such instrument.
- Plug the AC1200 into a power source and power it on while it’s still holding up the reset button.
- Hold press the reset switch for about ten seconds or until the extender’s indicator lights starts to flash, confirming a reset.
- Since the extension is reset to factory settings, it is active.
- To configure your Wavlink AC1200, join to the default WiFi network and follow the setup process again.