If you are facing difficulty in searching for How to find duplicate files in Windows 10? Then, your struggle comes to an end here. In this article, we will be discussing efficient ways to delete duplicate files in Windows 10.
In the prevailing age of internet blooms, searching and storing files has never been so easy. Collecting several files in storage is common in this era. However, while storing we unnoticeably collect several similar files. For this purpose, duplicate files occupy unnecessary space on your PC making it run slow. Further, these files can be in the form of photos, videos, audio, documents, etc.
The best way to tackle such problems is by tracing and removing them. But, if you are doing it manually then it could be a daunting or next to impossible task. Fortunately, there exist a couple of techniques to remove duplicate files on Windows 10. Moreover, the technique comprises two methods
- Using Windows inbuilt tools
- An Automated Solution to Remove Duplicates
How to Delete Duplicate Files on Windows 10 Using Windows Built-in Tool?
Generally, Windows 10 comes with built-in tools to assist you in deleting duplicate files. Also, by following this approach, you can accurately identify similar files and remove them. Further, clearing up the space can give way to more data storage and PC speed. In addition to it, the standard built-in tool to remove duplicate files on Windows 10 is Windows PowerShell. Make sure to meticulously follow each step without any errors.
Windows PowerShell
To see the results start using Windows PowerShell on your Windows 10, by following the below-given steps:
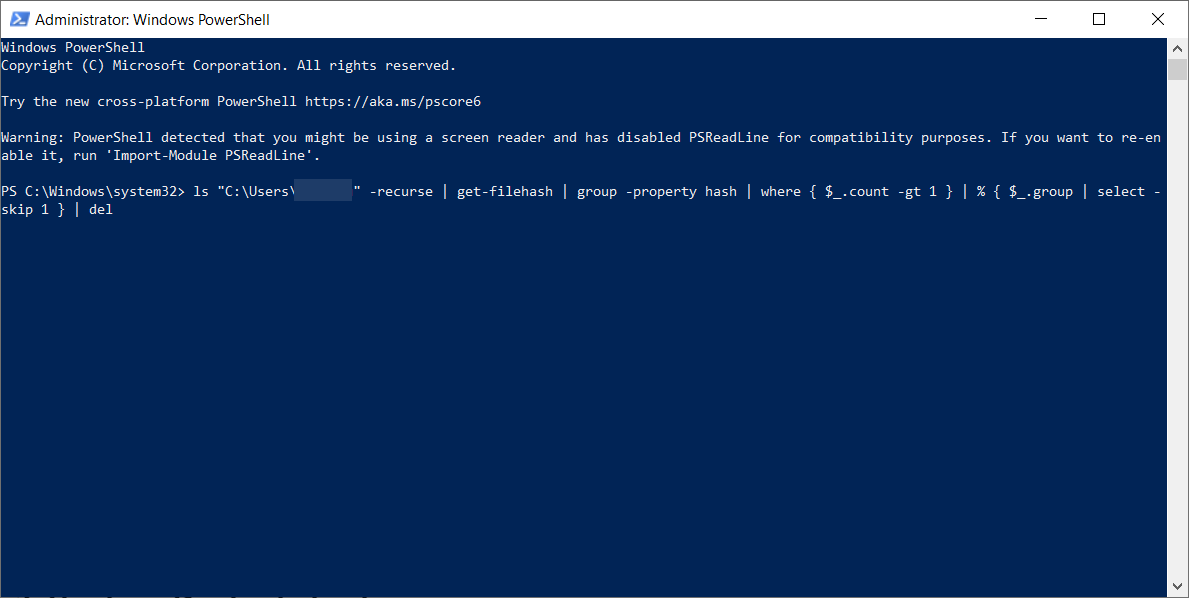
Step 1: Right-click on the Windows button in the left bottom button. Then, from the list of features choose Windows PowerShell (Admin).

Step 2: Type the command “set-location –path C:\” to set the location path to your primary drive.

Step 3: Next, copy the command line given below and paste it into Windows PowerShell. However, keep in mind to replace the search folder and location folder with their actual folder names. After that, hit the Enter button.
ls “(search folder)” -recurse | get-filehash | group -property hash | where { $_.count -gt 1 } | % { $_.group } | Out-File -FilePath “(location folder)

Step 4: This scanning process will take some time depending on your computer’s capabilities. And also on the number of files in the selected folder. After completion of the scanning process, a results file (.txt file) will be attached to the search folder. Next, open the results file to locate and delete the duplicate files.

Step 5: In spite of manually deleting the duplicates, paste the command given below in PowerShell. However, make sure to replace the search folder with the actual folder name.
ls “(search folder)” -recurse | get-filehash | group -property hash | where { $_.count -gt 1 } | % { $_.group | select -skip 1 } | del
Demerits of Using the Free Solution to Find and Delete Duplicate Files
No doubt that the Windows inbuilt tool is easy and simple but it has several limitations such as
While the built-in Windows tools are user-friendly and serve many purposes, they do indeed come with limitations. Some of these limitations include:
Limited Functionality:
Built-in tools often provide basic features, which might not be sufficient for advanced tasks or specialized needs.
Lack of Customization:
Built-in tools usually have fixed features and options, limiting your ability to customize settings or behavior according to your preferences.
No Automation:
Automation is often limited or absent in built-in tools, making repetitive tasks more time-consuming.
Compatibility Issues:
Built-in tools might not always support the latest file formats or technologies, leading to compatibility issues with newer software or hardware.
Security Concerns:
Some built-in tools might not have advanced security features, leaving your system more vulnerable to threats.
Performance Constraints:
Resource usage and performance optimization might not be as efficient in built-in tools compared to specialized third-party alternatives.
Advanced Features:
Complex or advanced features required for specific tasks may be lacking in built-in tools.
User Interface Limitations:
The user interface of built-in tools might not be as intuitive or user-friendly as dedicated third-party software.
Updates and Support:
Built-in tools might not receive regular updates or dedicated support compared to third-party tools, potentially leading to compatibility issues over time.
File Size and Conversion Limits:
Some built-in tools have restrictions on file sizes or limited conversion options.
Data Recovery and Backup Limitations:
Built-in backup and recovery tools might not offer comprehensive options or flexibility for data protection.
Multimedia Editing:
For multimedia tasks like video or audio editing, built-in tools might lack advanced features available in specialized software.
To overcome these limitations, users often turn to third-party software solutions that offer more advanced features, customization options, automation, and enhanced performance. However, it’s essential to choose third-party tools carefully to ensure they are trustworthy, secure, and compatible with your system.
How to Remove Duplicate Files in Windows 10 Using an Automated Method?
Utilizing third-party applications for eliminating duplicate files on Windows 10 presents a favorable option compared to using built-in tools. These external software solutions are notably adept at efficiently identifying and eradicating all instances of duplicate files present on your computer.
One particularly well-regarded third-party solution is SysTools duplicate media finder. This software specializes in locating and deleting duplicate files, subsequently enhancing your computer’s speed and performance. To initiate the process, similar to other third-party tools, you’ll be required to download and install the application onto your computer.
Step 1: Initiate the software and then select the designated folder by clicking on “Add Folder.” Once you’ve confirmed your folder choice, click “OK.”
Step 2: A new window for Scan Configuration will emerge. Here, pick your desired scanning preferences, and then proceed by clicking “Continue.”
Step 3: Upon the completion of the scanning process, a final window will appear, allowing you to perform necessary actions like previewing, deleting, and moving files.
In Conclusion
Having absorbed the information presented, you should now possess the solution to the query, “How to Remove Duplicate Files on Windows 10?” You are now well-versed in the process of eliminating duplicate files on Windows 10 using both native tools and automated solutions. While the built-in tool is accessible, it may not be entirely dependable. Conversely, the professional tool offers extensive coverage along with various customization choices.