Today, I am going to take it all the way back to the other end and talk to you about a drill, which is probably one of the first tools that most people will ever use wherever in time.
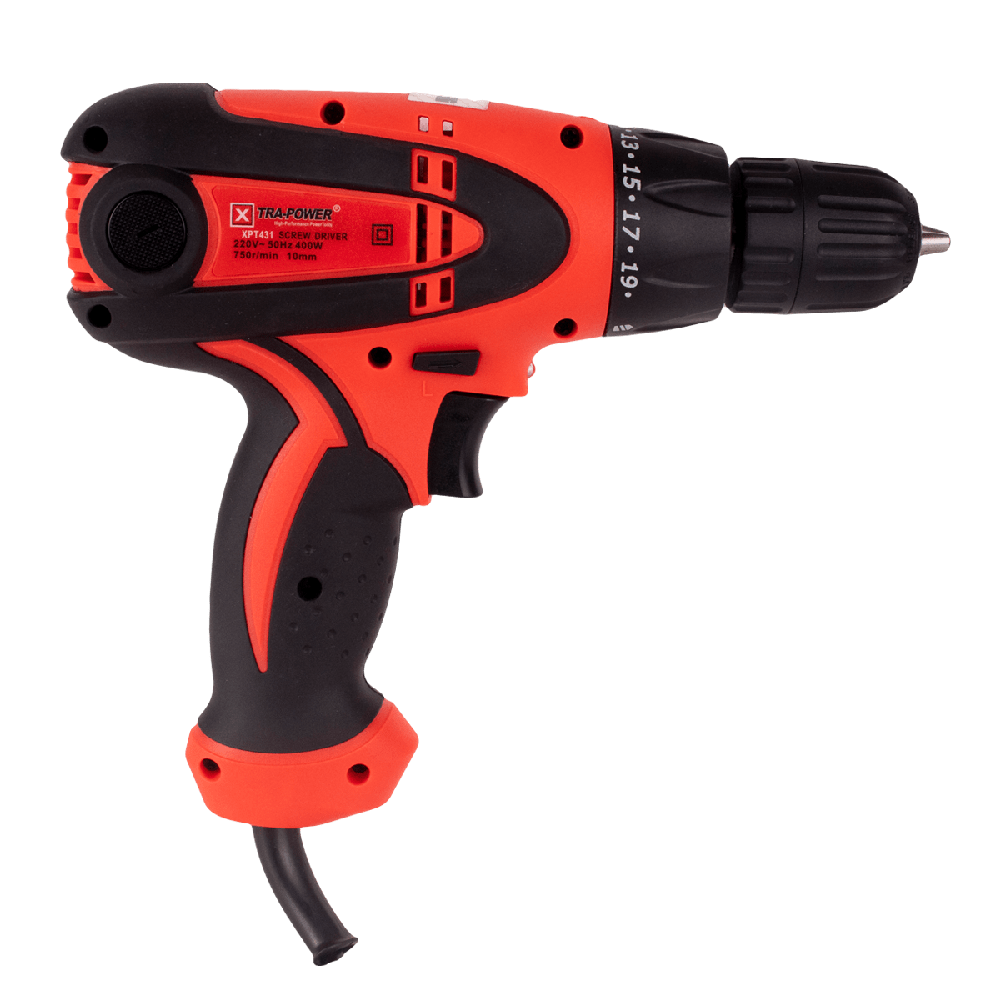
I’m planning to talk to you guys as if you are my 19-year-old self that does not know a Screwdriver Drill. So they will be as beginner-friendly as possible, but also as comprehensive as I can think to make them so to begin at the beginning. It is a drill. Lithium-ion is the type of battery and DOOL is, of course, the toymaker.
So on the top of the Joe is where you can change what gear your drill is operating in, three being the most powerful and one being the slowest. And then once you have your gear selected, you can change the speed and the power of the drill even further by turning this knob with numbers on it. And again, the higher numbers are more powerful and the lower numbers are less.
So let’s say We are trying to attach this coat hook with these really tiny screws that come along with it. If I had your drill settings all the way on high and I just held down the trigger without being careful, Your screw would start to spin inside of the wood and that means that it’s been stripped out.
Instead of threading into the piece of wood, this group simply spins inside it without gripping anything.
We can’t put your job in reverse and back it out because it doesn’t have any wood to grab onto. And also, this is not effectively attached because We can just pull it right out.
1 Trigger Control
If you find that trigger control is an issue for you or if you’re just acclimatizing yourself to the drill and you want to be careful, the solution is to turn your settings down all the way, especially for something this tiny to get all the way down to one in one, and your drill will go much slower.
Some drills will stop themselves completely when they meet resistance, mine doesn’t. But as you can hear, it starts to run a lot slower. That indicates your screw is tight, and you should ease off the trigger as you get used to the drill.
2 Power and Speed
In most cases, you’ll probably have your power and your speed turned all the way up so that you have all the power when you want it. And you’ll just use the pressure of your finger on the trigger to adjust how much force you’re actually putting behind something.
Even with your settings at the top, at three and 22, We can pull slightly on the trigger a little bit of course, but I can go all the way and really get after it.
The top of the drill, that skinnier black ring is where you adjust the mode that you’re drill is operating in to help us out. The modes are depicted in pictures. So for the drill to operate best, you want your indicator pointing at the screw when you’re screwing something in pointing at the drill bit when you are drilling a hole, and pointing at the hammer when you are using the hammer drill function to drill into masonry material.
So all of those modes and options are kind of best practice. But honestly, when you buy it, you can do whatever you want with your drill. I personally don’t ever worry about these two settings. As far as I can tell the drill operator, they’re kind of interchangeable. You absolutely don’t want to ever use the Hammer Joe setting unless you are trying to drill into something masonry. The reason being that the way the hammer drill function works is in addition to spinning your drill bit, it also has a slight forward and backward hammer.
That is not good for any application except drilling a hole in the concrete. So all of those modes and features are things that you will use more occasionally with your drill.
3 Drill Buttons
You’ll be working with it almost every time you’re using it. This is your directional button that will determine how the drill is spinning. If you have your forward-facing arrow pushed in, your drill will spin clockwise, which will screw in a screw.
If you have your rear-facing arrow pushed in, your drill will spin counterclockwise and that will back a screw out.
The other time that you use these buttons is when you’re changing your drill bit. To change the drill bit, you’ll need to manipulate your directional buttons and hold onto this part of the drill. So the forward side of the button is pushed in and I hold onto this and I pull the trigger.
So that feature enables you to work with all different types of jobs. If I want to use this quarter-inch drill bit, you can see this is all the way closed. So We will put it in reverse. Hold that part.
Until We have enough room to insert the drill bit and then to tighten it up, I will hold the bit in here pushing the forward button and not holding the drill bit.
You want to hold the drill bit while you do that. And the reason for that is that you want to keep your job in the center while you’re tightening it to show you.
We will tighten it real quick without holding on and you see what happens. So obviously, we can’t drill anything that way. So hold it in the center while you’re tightening it.
4 Tight Spinning
This part of the drill starts spinning in your hand, which means it’s tight. So you want to let off the trigger. And again, holding onto this part of the drill, spinning counterclockwise, you’ll click. And what that does is it tightens it even more. That extra step of hand tightening is important. Otherwise, what will probably happen is as you’re walking along and going from forward to reverse drilling and drilling out, this bit will come loose.
Whereas if you take the time to tighten it manually, it doesn’t do that.
When you’re ready to drill your hole, make sure that your forward arrow is pushed in Button. If you don’t, the drill bit will just kind of spin and not bite into the wood and smoke in Starfire.
Make sure you press your forehead area firmly and hold the drill straight, both vertically and horizontally, so the drill bit follows a completely straight path and does not split the material on either side. Start the hole by applying just a little pressure on the trigger for the easiest results.
Once you know you’re in the right spot, gradually pull the trigger tighter until you have no.
If you are drilling a shallow hole, you probably will not need to throw your drill in reverse in order to get it out. You can just kind of like just because you are and then pull the drill back. If you’re not drilling your hole and you can’t pull the drill out, just start in reverse and it will work itself out. So now I’m done drilling holes and I want to screw something in. I would throw your gel in reverse. Hold onto that part.
If you did what I said and your hand tightens that, you’ll probably have to have a really firm grip in the beginning. But once it gets fast, it’s easy to loosen up so that I can remove the bit, and then We will throw your drill in for a year to tighten it.
Hey, you know, that is sexist, but ladies, when you are screwing and screwing with a drill, you have to make sure that you are pushing down with enough force so that bit stays in the grooves of this screw. And I have to know if you have enough force or not. This is a good sound. This is a bad time. Anybody that worked a lot with drills will make fun of you.
You will not be able to push it further in or remove it because the driver can no longer grip it. Additionally, you will bend the ridges of your bit, which damages it in the same way by preventing it from properly driving a healthy screw.
End
That was perfectly good to start out with. So once your screw has a good bite in the material and you don’t have to worry about it bending one way or the other. Use those muscles. What I and a lot of people who are not women like to do to make the job easier is work with screws and bits that have a star pattern because there are more points of contact in that pattern. The bits in the screw a lot more easily without as much effort apart from you.
But I hope that was a good introductory overview.