Spring is the season of rebirth. Thanks to the thousand colors and the many flowers, it is possible to create beautiful spring decorations. As you have already guessed, as the main element, we have chosen flowers. If you have waited a long time to create compositions, you will find the inspiration you need to embellish your home simply and not in the last economic place in the following photos. Follow the tutorials and put all your creativity into practice.
Handmade spring decorations
Decorating your home according to the seasons is the ideal way to always be in a good mood. If you are a DIY lover, then spring is the perfect time to put what you have in mind into practice. In the following photos, we show you how to embellish the windows, the front door, and the table with compositions with the main element flowering. A wreath of lavender flowers, a particular centerpiece, or, why not, a wall decoration with wooden letters. It is up to you to choose the one that best suits the style of furniture and your tastes of landscape drawing.
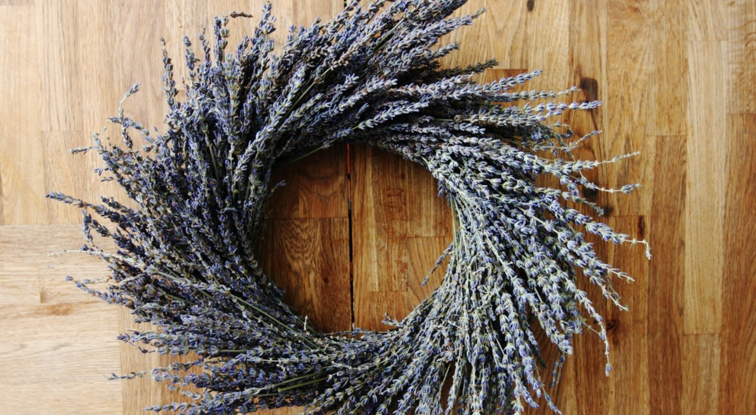
DIY Spring Decorations: Lavender Flower Garland Wreath
As soon as you try to think of lavender flowers, the delicious scent immediately comes to mind. Opt for the second variant. We assure you that the scent is still so intense. To dry, it is necessary to prune, tie the flowers to a bunch and hang them to dry for about 2-3 weeks. For the following tutorial, you can decide whether to use fresh or already dried ones. This spring decoration is ideal for scenting and decorating the home, especially for those of you who love flowers and especially lavender.
Material:
- 5 bouquets of lavender flowers
- Metal ring with a diameter of 30 cm
- Wire
- Pruning shears
Instructions:
1. Choose a starting point on the metal wreath and tie a small knot with the thread.
2. Cut the lavender as you go. The shorter you cut the lavender, the better. It is to avoid showing longer branches, and they also consume space.
3. Wrap the floral wire around the branches to attach the lavender to the wire wreath. 2-3 times are enough.
4. Keep adding branches on top as you go. TIP if you don’t want the wire garland to be shown: the best technique to avoid this is to sprinkle each bunch of lavender from the inside to the outside of the garland so that they cover all the space you need to cover, as you see in the images below. A dried lavender wreath is NOT forgiving, and it’s hard to correct these kinds of mistakes once they’re made.
5. The end of the lavender wreath is the hardest part. Cut your branches short and stick them there somehow.
DIY Easter decorations
Spring is nature’s way of saying: “Let’s celebrate”! And we all know that a good party includes some eye-catching decorations. Spring is also beautiful because in this period we celebrate Easter. And here we can say that the two types of decorations cover each other equally. For this reason, in the following tutorial, we show you how to create a particular and really beautiful centerpiece.
Material:
- Flowers
- Floral foam
- Knife
- Glass container
- Stapler
Instructions:
1. With a knife from the floral foam, it fits into your glass bowl’s design and moistens the foam.
2. Secure the leaves with the stapler.
3. Start covering the side of the foam with the leaves, secure it with green pins.
4. Optional: decorate the centerpiece with chocolate eggs and bunnies.
Easter decorations to hang
From beautiful centerpieces to an eye-catching colorful entryway, spring decor offers plenty of ideas for your home. With the addition of this beautiful vacation, natural elements prevail to decorate our home’s interior and outside. For the following tutorial, you will need some patience and a place to hang this colorful design.
Material:
Hot glue gun
- Fake flowers
- Wooden or foam blocks
- Plastic caps
- Blackboard
Instructions:
1. Place the letter shapes in the designated locations on the blocks and mark them with a pencil to use as a guide for placing the flowers. Use your glue gun to glue 2-3 caps to the back of the wooden letters (lifting the board’s letters will allow you to fill behind the letters with flowers). Hot glue the bottom of each flower and use the guidelines to place the letters on the board. Let the glue dry.
2. The second step is to glue the flowers onto the board. It is recommended to cut the stems and glue them with the hot glue gun for better adhesion.
3. Continue gluing each flower, arranging and balancing the color placement as you go, until the entire board (and under the letters) is covered. Make sure the flowers hang from the edges of the sides so that the end of the board is hidden. Once the board is full, you can assemble or place the board in the desired place.